Documentation Index
Fetch the complete documentation index at: https://docs.evo-ai.co/llms.txt
Use this file to discover all available pages before exploring further.
Overview
The Workflow Agent is the most advanced and flexible type of agent on the Evo AI platform. Using LangGraph as the execution engine and React Flow for visual interface, it allows creating complex workflows with multiple node types, conditions, delays, and sophisticated flow control. Unlike other agent types (Sequential, Parallel, Loop), the Workflow Agent offers granular control over each step of the process, enabling the creation of complex business logic with conditional branching, custom loops, and advanced orchestration.Based on LangGraph: Implementation using LangGraph for workflow execution and React Flow for visual construction interface.
Key Features
Visual Interface
Drag-and-drop construction with React Flow for intuitive workflows
LangGraph Engine
Robust execution based on LangGraph for complex workflows
Multiple Node Types
Agent, Message, Condition and Delay nodes for maximum flexibility
Integrated Testing
Individual agent testing and complete workflow testing
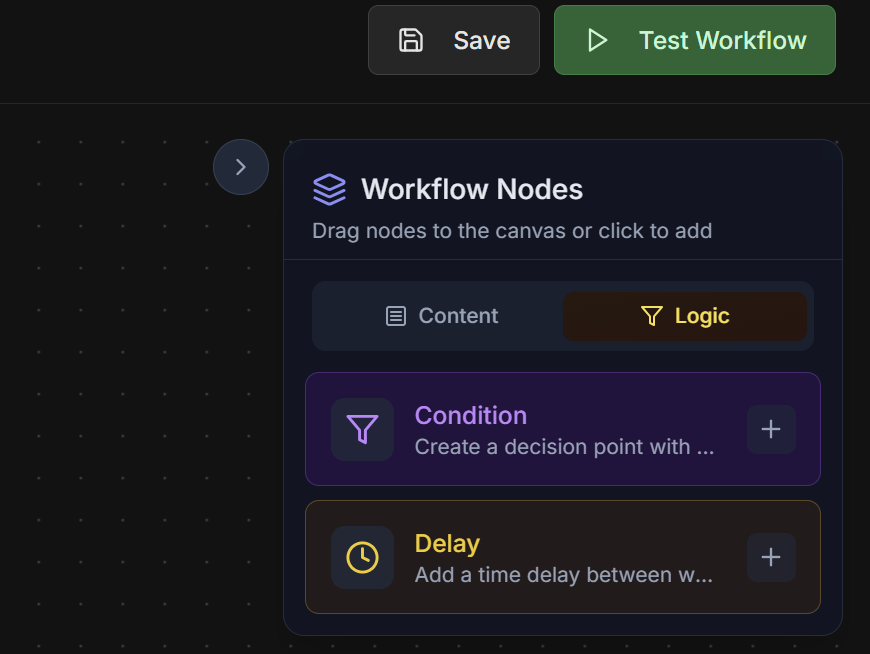
Node Types
1. Agent Node
Agent Node - Workflow Core
Agent Node - Workflow Core
Function: Executes agents (new or existing) as part of the workflowSettings: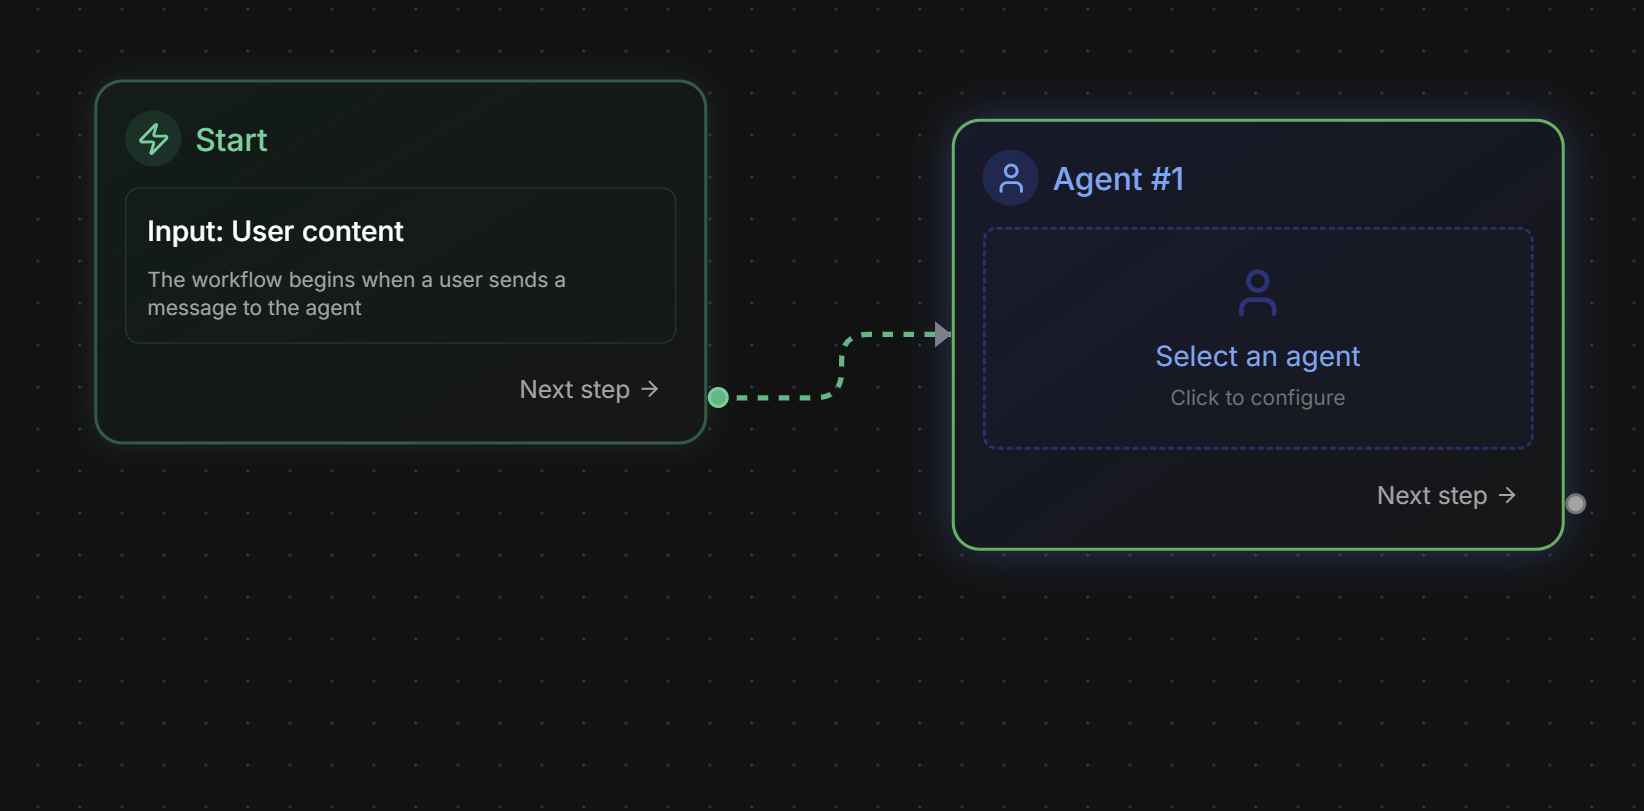
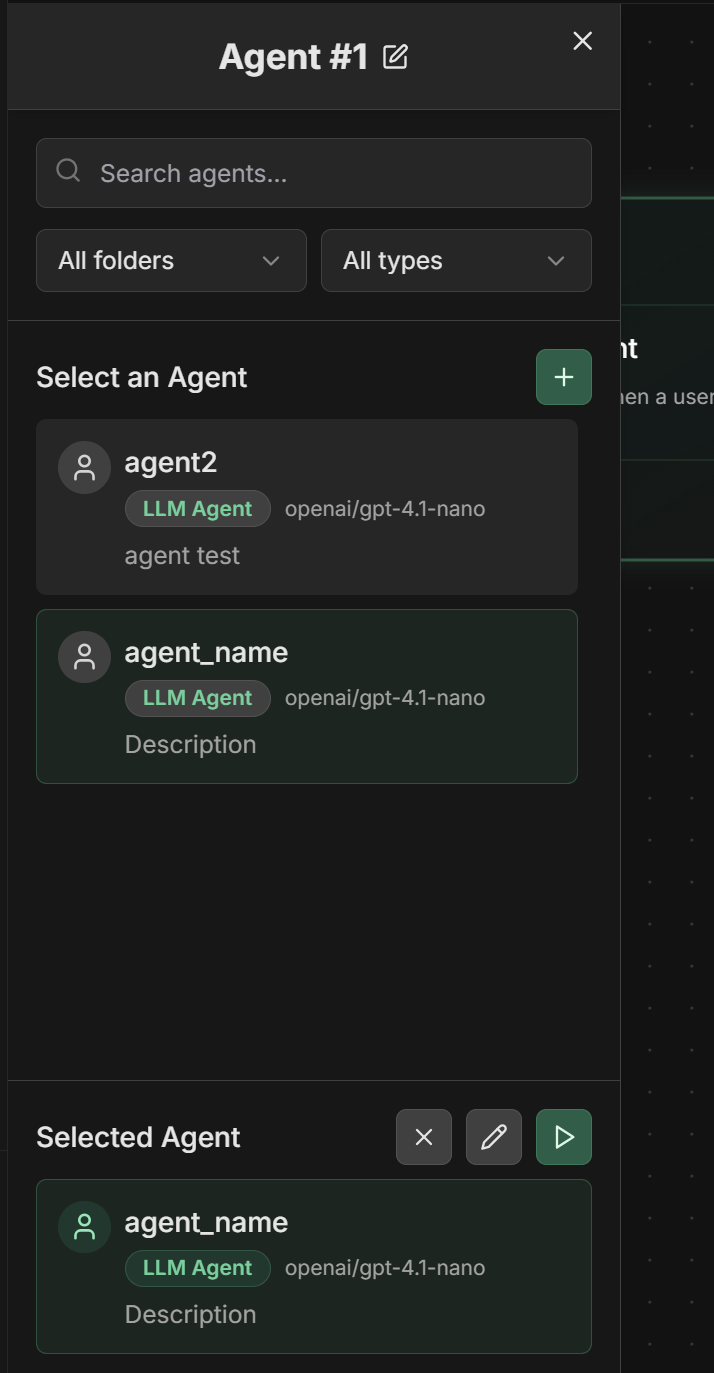
- Select Existing Agent: Choose from agents already created on the platform
- Create New Agent: Inline creation of agent specific to the workflow
- Edit Agent: Modification of existing agents
- Input Mapping: Input data mapping
- Output Key: Key to store result in context
2. Message Node
Message Node - Step Control
Message Node - Step Control
Function: Sends direct messages as agent in the flow, ideal for step controlSettings:Practical use cases:Progress Status:Context for Next Step: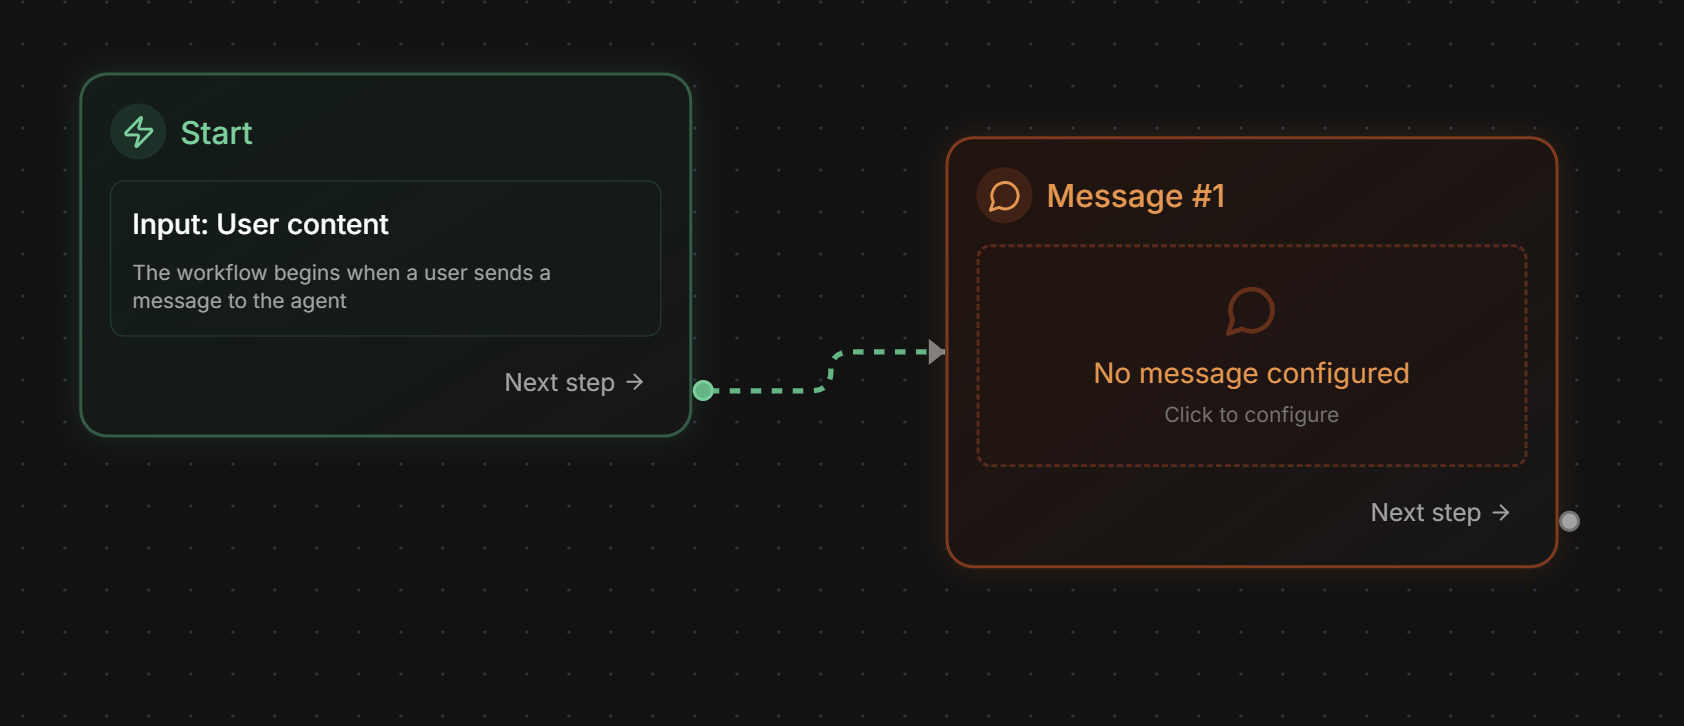
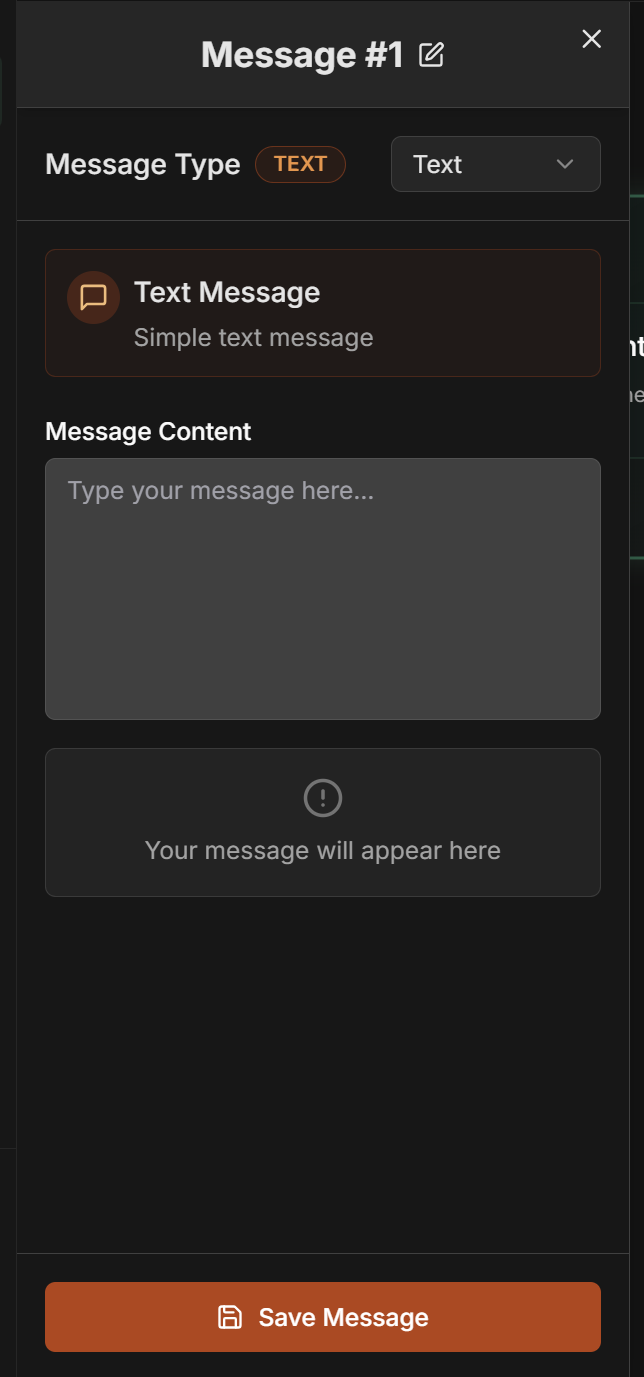
- Type: Message type (currently only “Text” available)
- Content: Message content to be sent
- Text: Message in plain text format
- Instructions for next nodes: Specific guidance for subsequent agents
- Status messages: Information about workflow progress
- Structured data: Formatted information for processing
- Context control: Messages that define context between steps
- Notifications: Alerts about specific states or conditions
- Process logs: Records of important workflow steps
3. Condition Node
Condition Node - Flow Control
Condition Node - Flow Control
Function: Checks output from previous node and directs execution based on conditionsCondition Type:Quality Score Verification:Execution Status Verification:Regex Verification:How to configure: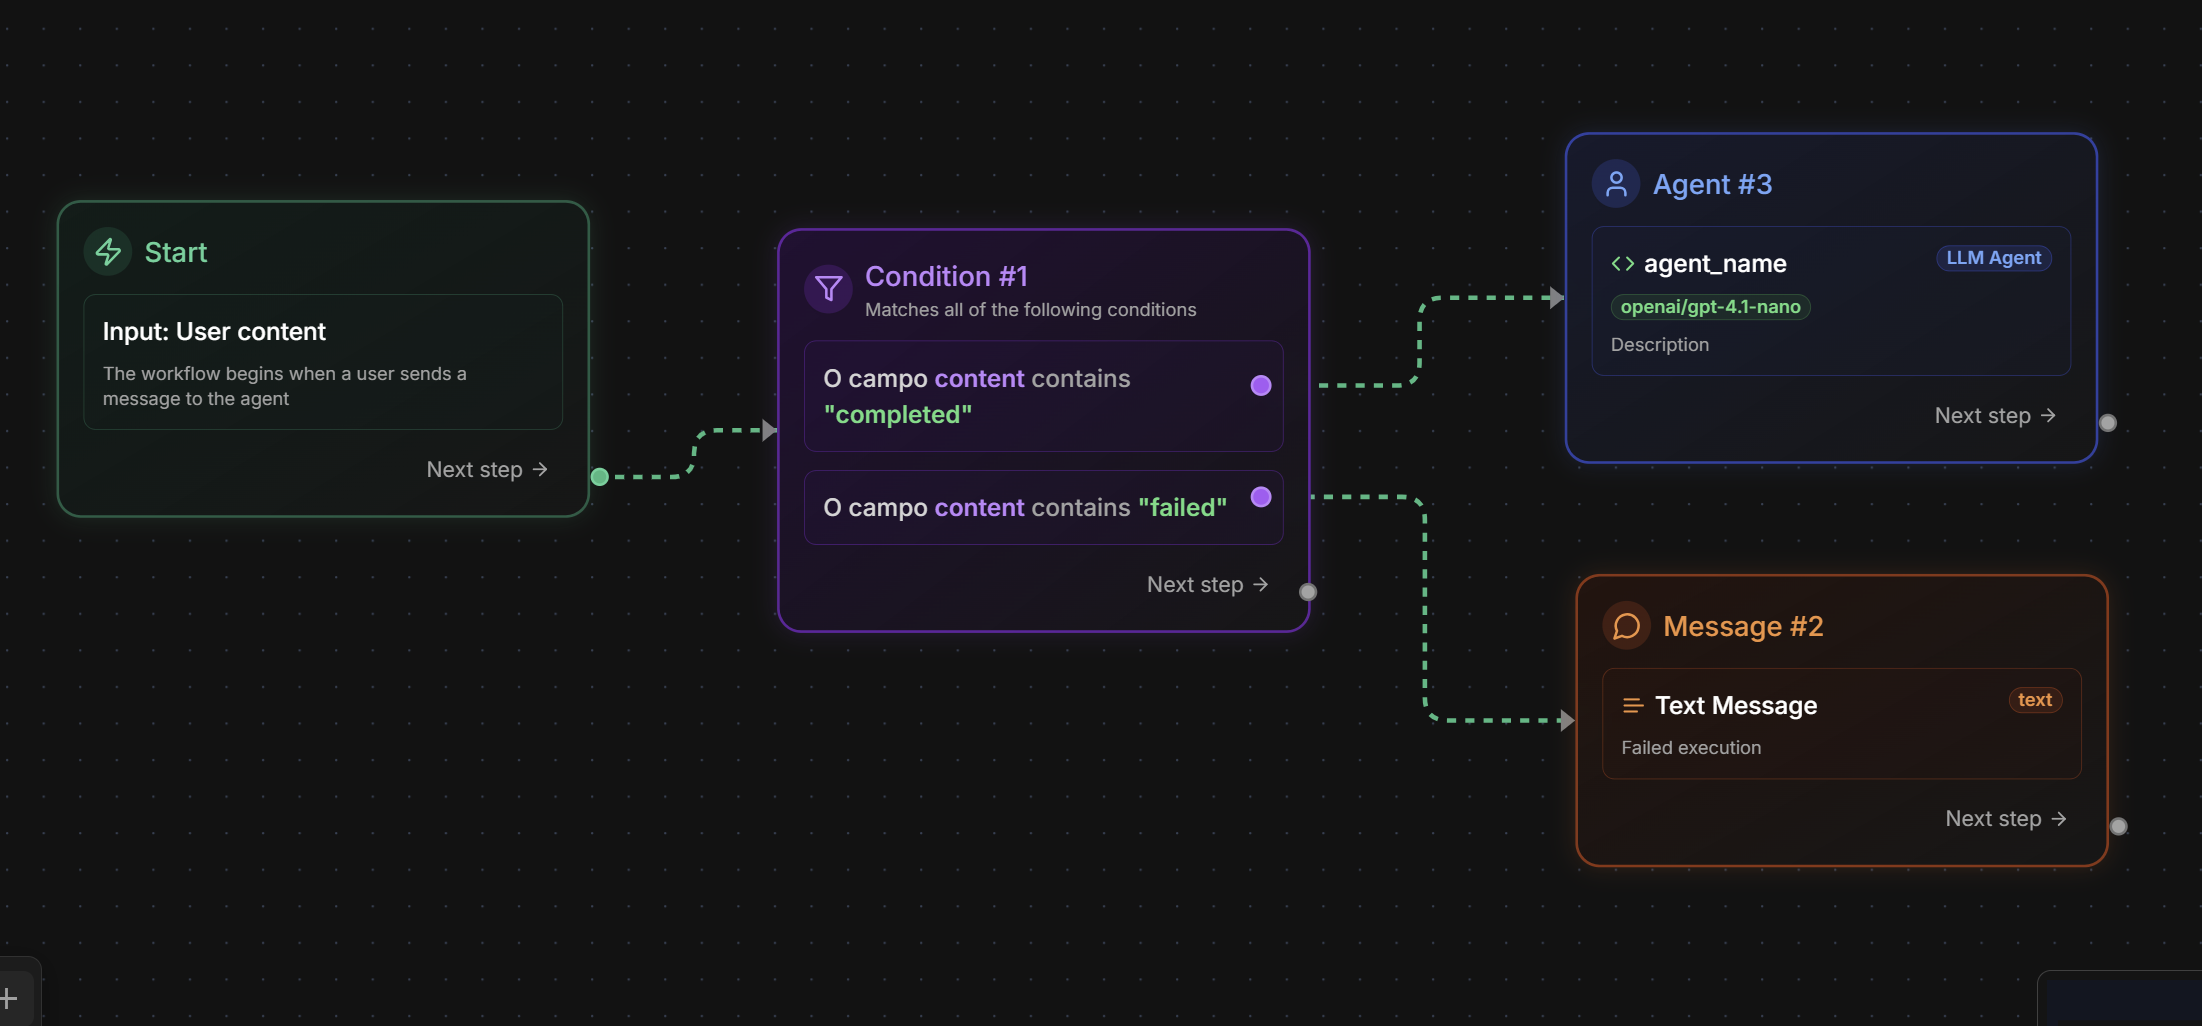
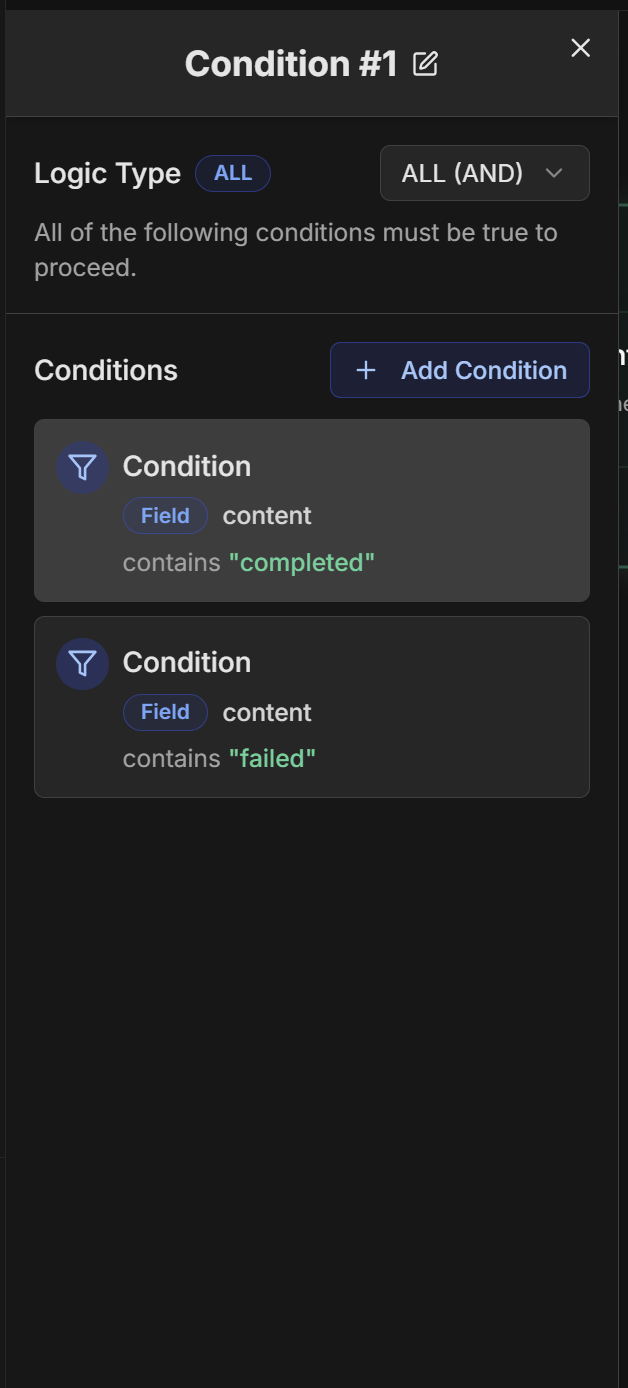
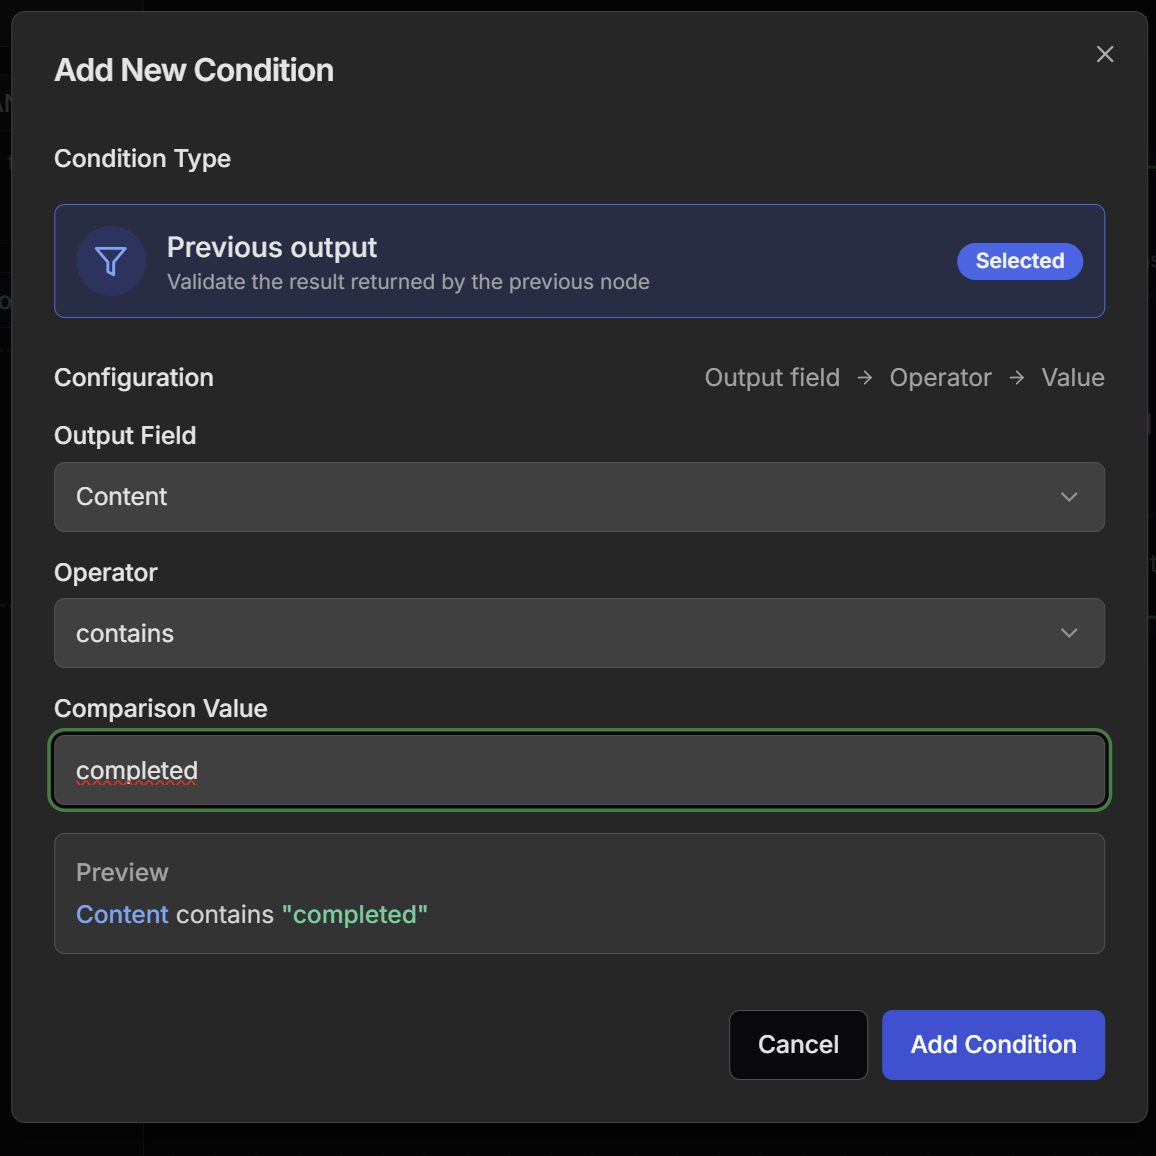
- Previous output: Validates the result returned by the previous node (only available type)
- Output Field: Field from previous output to check (Content or Status)
- Operator: Comparison operator
- Comparison Value: Value for comparison
- Preview: Preview of configured condition
- Content: Content of the response from previous node
- Status: Execution status of previous node
- is defined: Checks if field is defined
- is not defined: Checks if field is not defined
- is equal to: Field equals specified value
- is not equal to: Field does not equal specified value
- contains: Field contains specified text
- does not contain: Field does not contain specified text
- starts with: Field starts with specified text
- ends with: Field ends with specified text
- is greater than: Field is greater than numeric value
- is greater than or equal to: Field is greater than or equal to value
- is less than: Field is less than numeric value
- is less than or equal to: Field is less than or equal to value
- matches the regex: Field matches regular expression
- does not match the regex: Field does not match regex
- Select “Previous output” as Condition Type
- Choose the Output Field (Content or Status)
- Select appropriate Operator
- Enter the Comparison Value
- Check the condition Preview
- Configure True/False paths by connecting outputs
4. Delay Node
Delay Node - Time Control
Delay Node - Time Control
Function: Adds simple delays in workflow for timing controlSettings:Processing Delay:Prioritization Delay:Scheduling Delay:Practical use cases: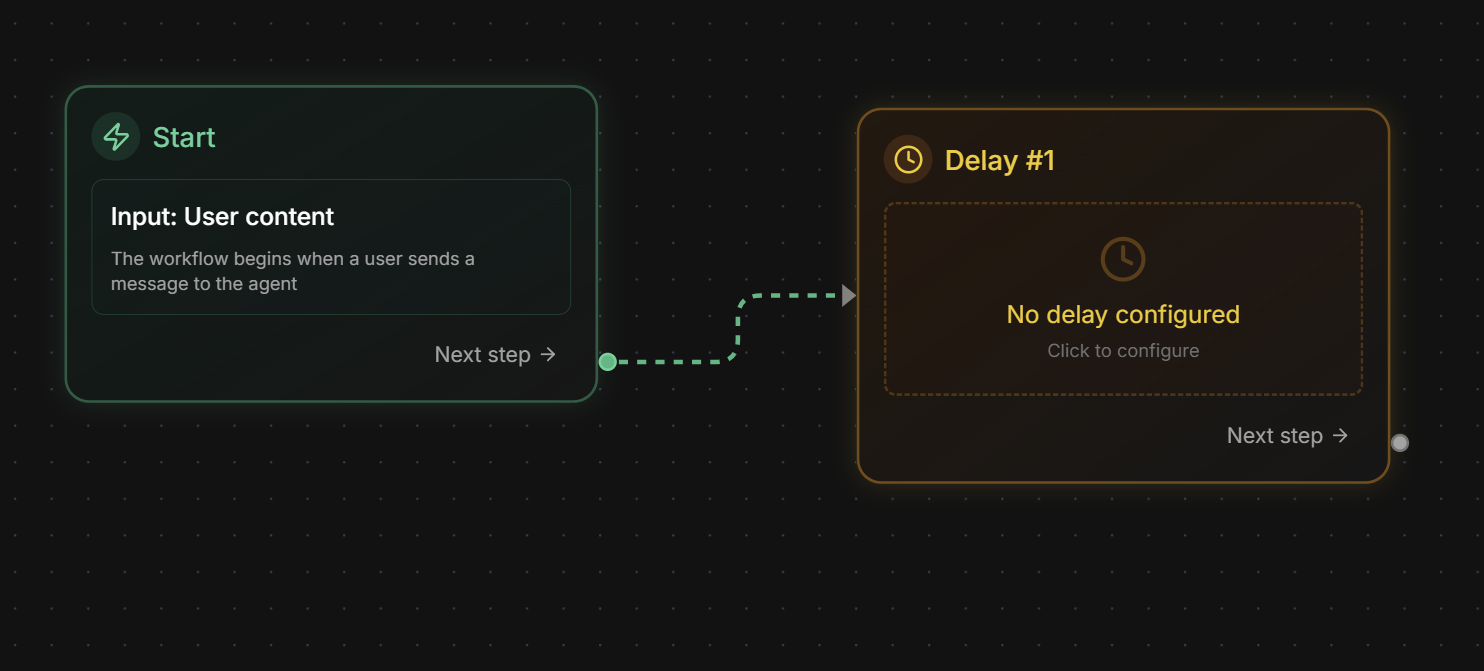
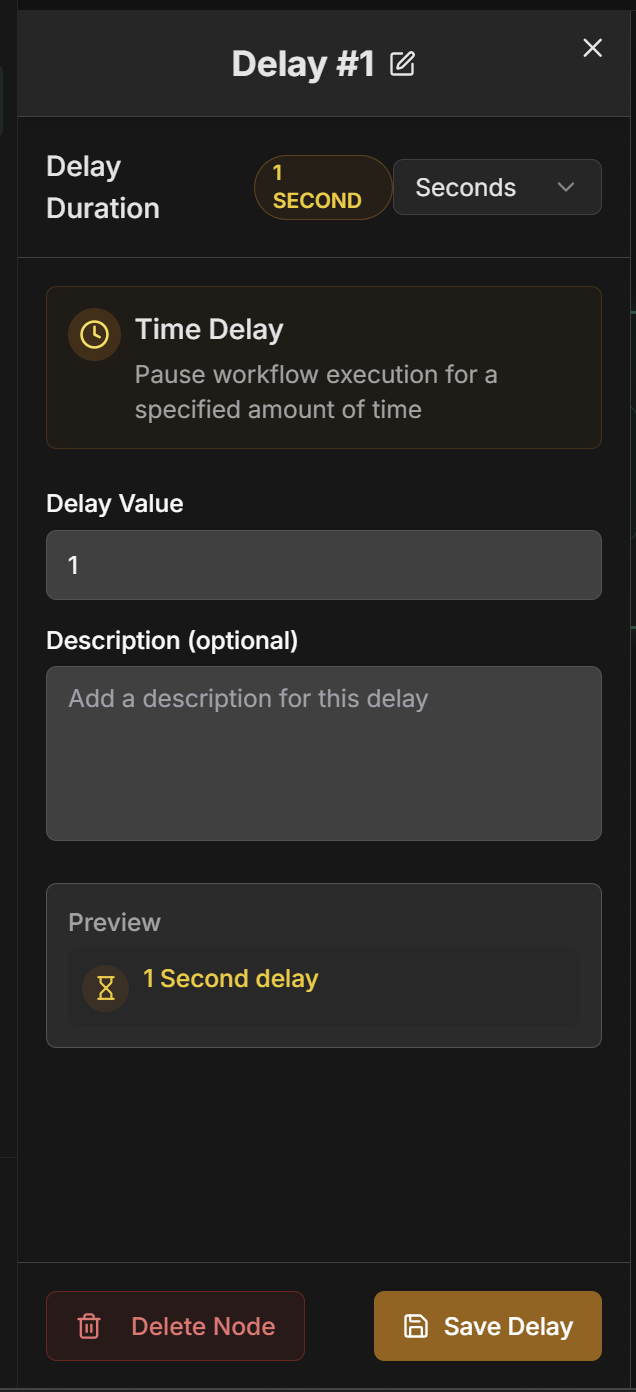
- Delay Value: Numeric delay value
- Time Unit: Time unit (seconds, minutes, hours, days)
- Description: Optional description of delay purpose
- Seconds: For short delays (1-59 seconds)
- Minutes: For medium delays (1-59 minutes)
- Hours: For long delays (1-23 hours)
- Days: For very long delays (1+ days)
- Rate limiting: Avoid overloading external APIs
- Wait for processing: Time for external systems to process
- Simulate human time: Realistic delays in automations
- Throughput control: Manage processing speed
- Scheduling: Delays for specific times
- Prioritization: Different delays based on priority
Creating a Workflow Agent
Step by Step on the Platform
1. Start creation
1. Start creation
- On the Evo AI main screen, click “New Agent”
- In the “Type” field, select “Workflow Agent”
- You will see the React Flow visual interface
2. Configure basic information
2. Configure basic information
Name: Descriptive workflow nameDescription: Complex workflow summaryGoal: Workflow objective
3. Build visual workflow
3. Build visual workflow
React Flow Interface:Node Palette: Drag nodes from palette to canvas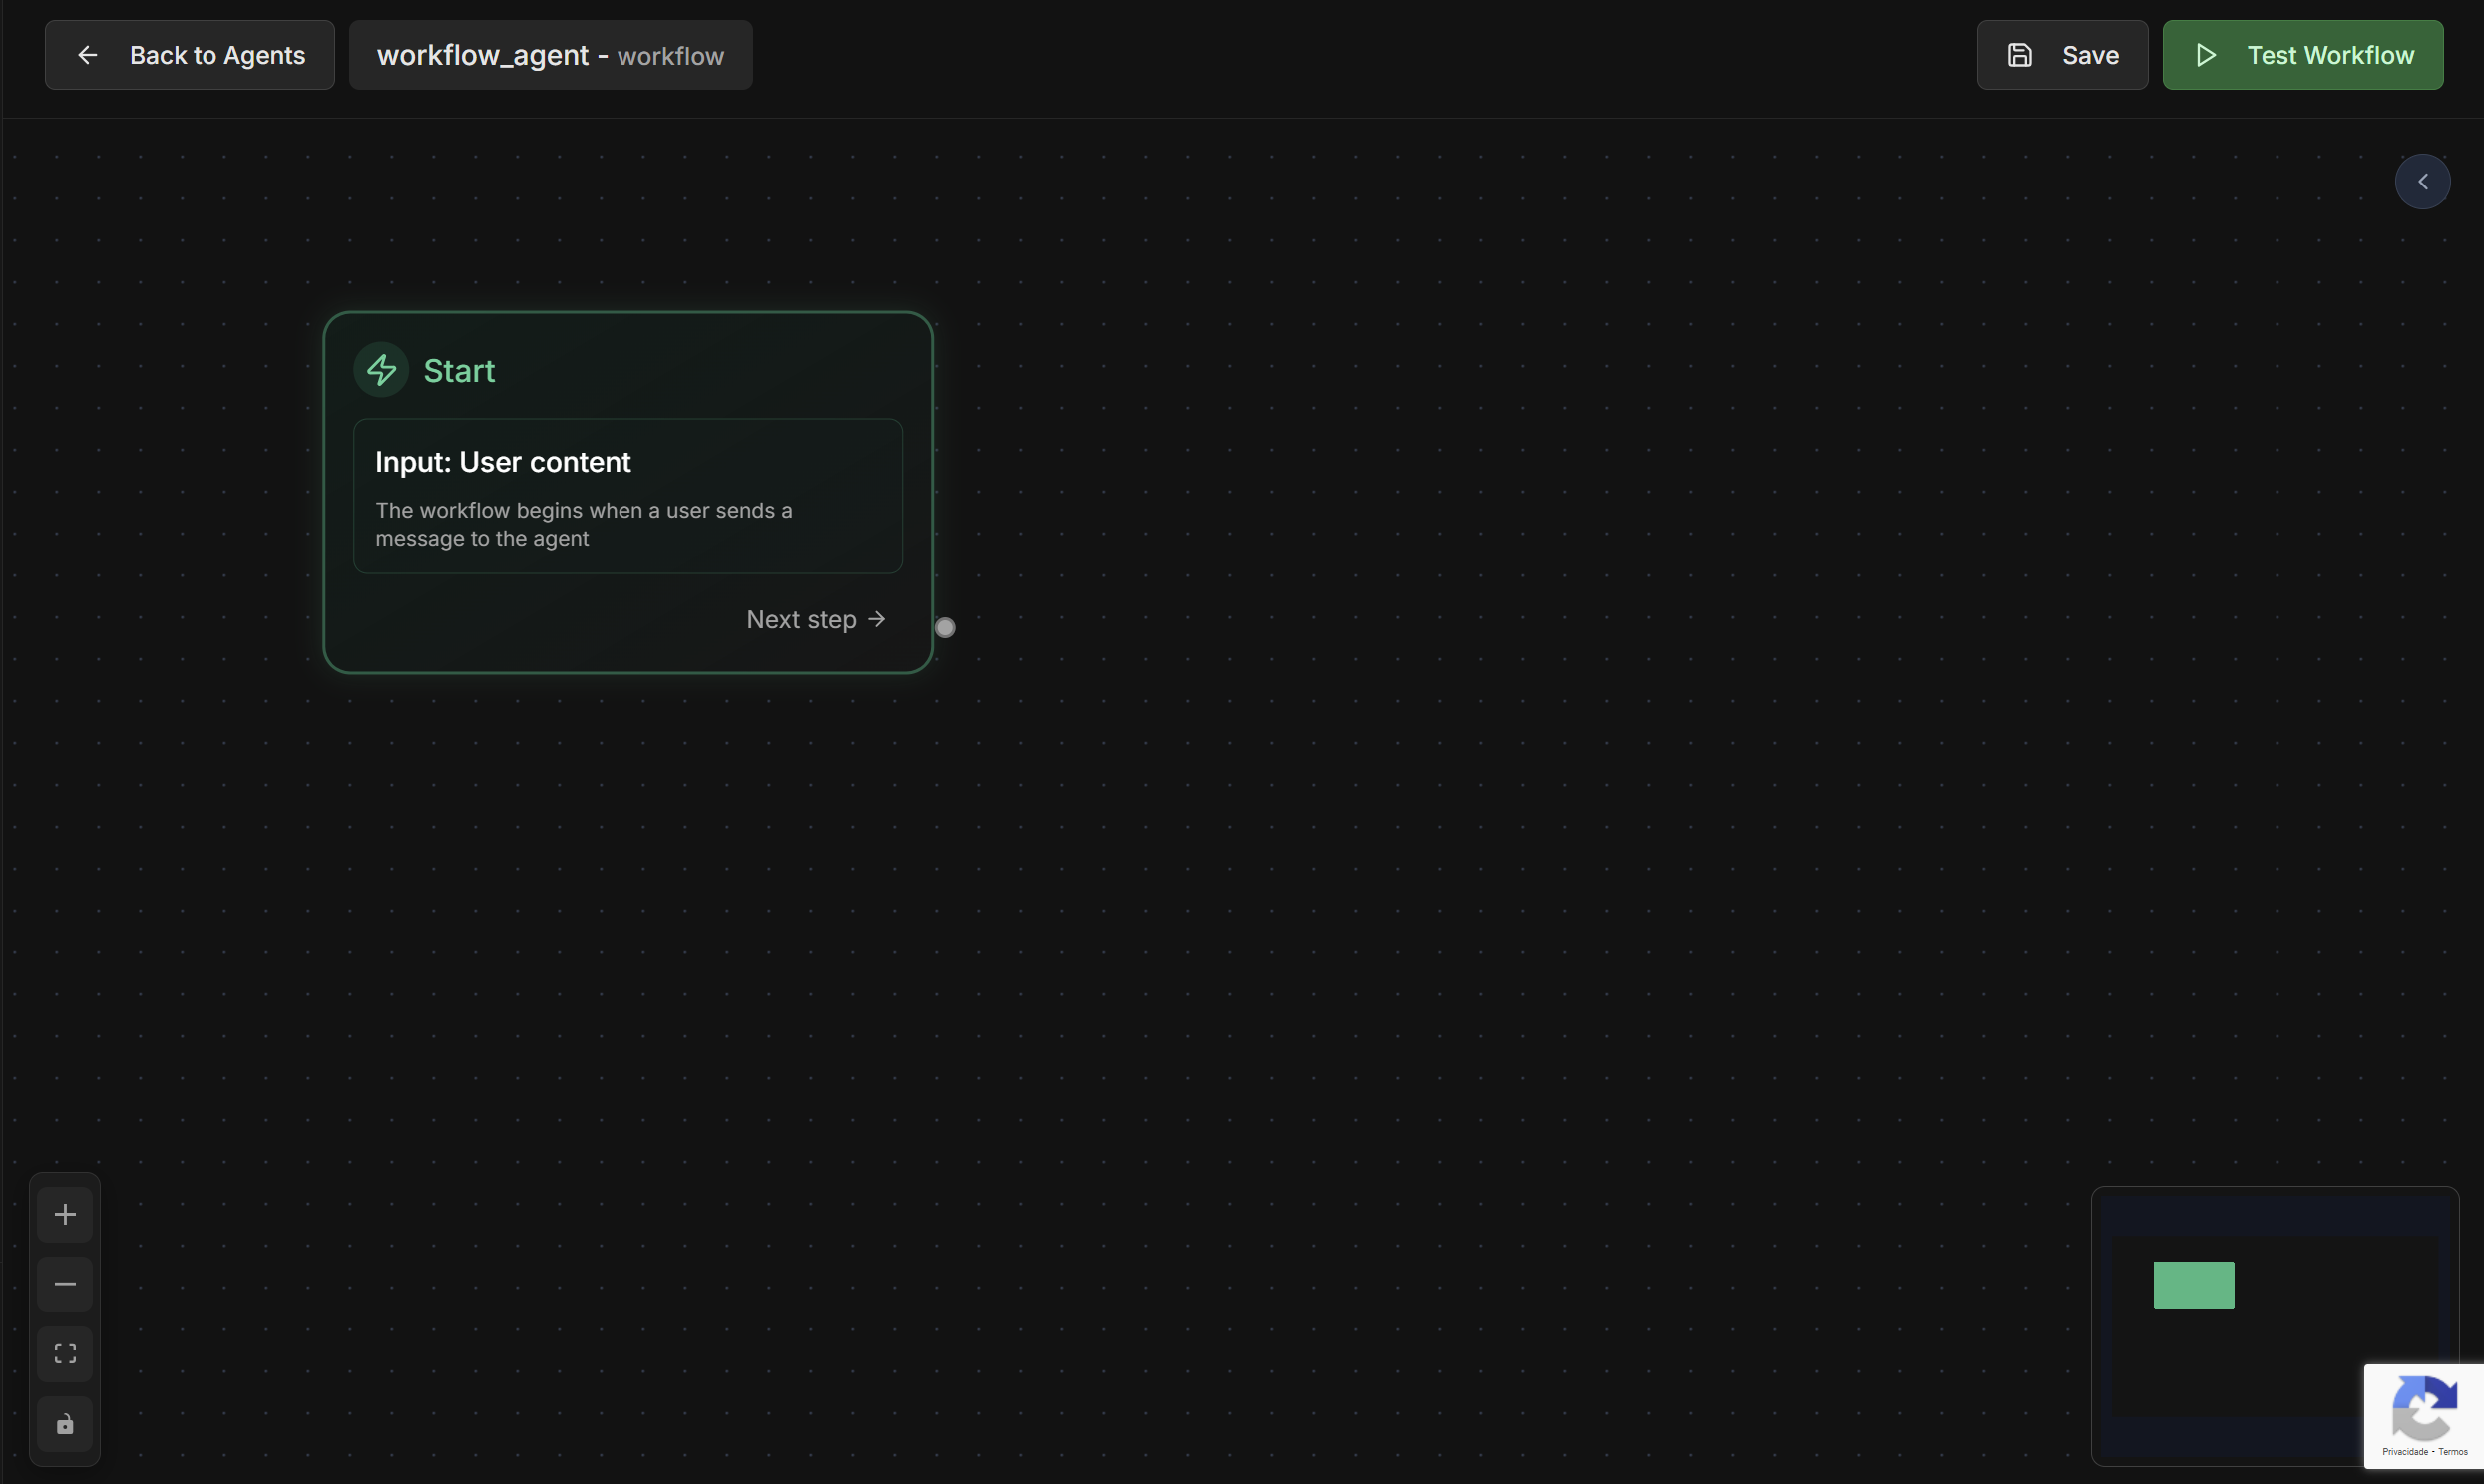
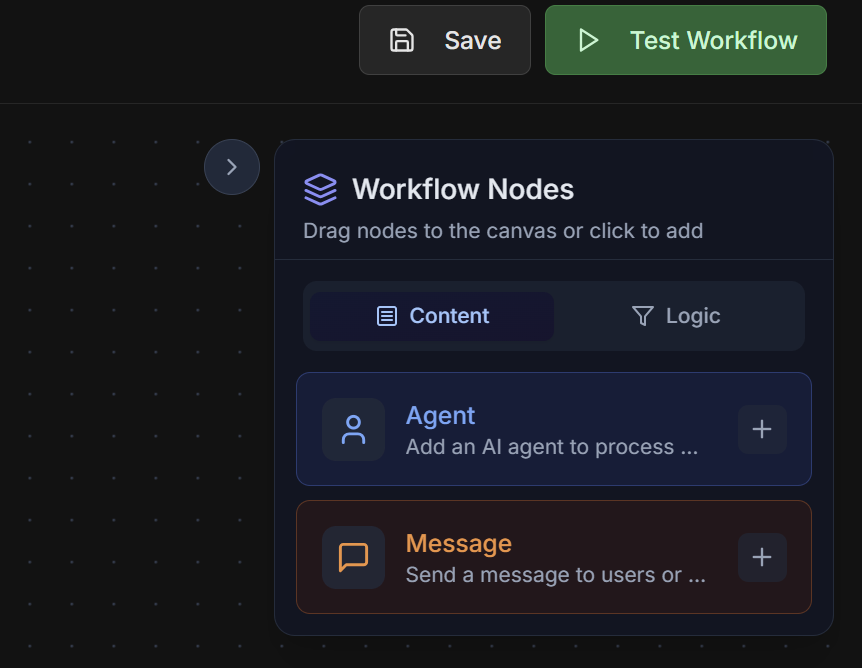
- 🤖 Agent Node - To execute agents
- 💬 Message Node - For direct messages
- 🔀 Condition Node - For conditional logic
- ⏱️ Delay Node - For time delays
4. Configure individual nodes
4. Configure individual nodes
For each node in the workflow:Agent Nodes:
- Select existing agent or create new
- Configure input mapping
- Define output key
- Write message content
- Use context variables
- Configure message type
- Define verification logic
- Configure true/false paths
- Test conditions
- Configure duration
- Define skip conditions
- Configure dynamic delays
5. Connect and validate flow
5. Connect and validate flow
Connections between nodes:
- Drag from one node’s output to the next’s input
- Validate that all connections make sense
- Configure multiple outputs for Condition Nodes
- Infinite loop verification
- Data type validation
- Orphan node checking
- Complete path verification
- Every workflow needs a Start node
- Configure End nodes for different scenarios
Practical Examples
1. Content Approval Pipeline
Workflow Structure
Workflow Structure
Objective: Automate content approval with multiple verificationsWorkflow flow:Detailed configuration:1. Message Node: “Initial Instruction”2. Agent Node: “Quality Analyzer”3. Condition Node: “Score >= 8.0?”4. Agent Node: “Automatic Approval”5. Agent Node: “Manual Review”6. Condition Node: “Approved in Review?”7. Delay Node: “1 hour”
2. Lead Analysis Workflow
Workflow Structure
Workflow Structure
Objective: Process leads with intelligent analysis and automatic routingWorkflow flow:Main nodes:1. Agent Node: “Data Enricher”
- Enriches lead data with public information
- Output: enriched_data
- Calculates score based on criteria
- Input: enriched_data
- Output: lead_score
- Filters low quality leads
- Condition: score greater than 70
- Identifies VIP leads
- Condition: score greater than 90
- VIP Router: For senior salespeople
- Normal Router: For standard salespeople
- VIP: 5 minutes (high priority)
- Normal: 30 minutes (standard priority)
3. Document Processing Workflow
Workflow Structure
Workflow Structure
Objective: Process documents with validation and automatic approvalComplex flow with loops:
Testing Features
Individual Agent Testing
Agent Form Test
Agent Form Test
Testing individual agents within the workflow:How to use:
- Click on any Agent Node in the workflow
- Select “Test Agent” from context menu
- Configure test inputs
- Execute isolated test
- Analyze outputs and performance
- Quick validation of individual agents
- Debug specific issues
- Test different inputs
- Verify expected outputs
Complete Workflow Testing
Test Workflow
Test Workflow
Complete workflow testing with real data:How to use:Workflow test interface: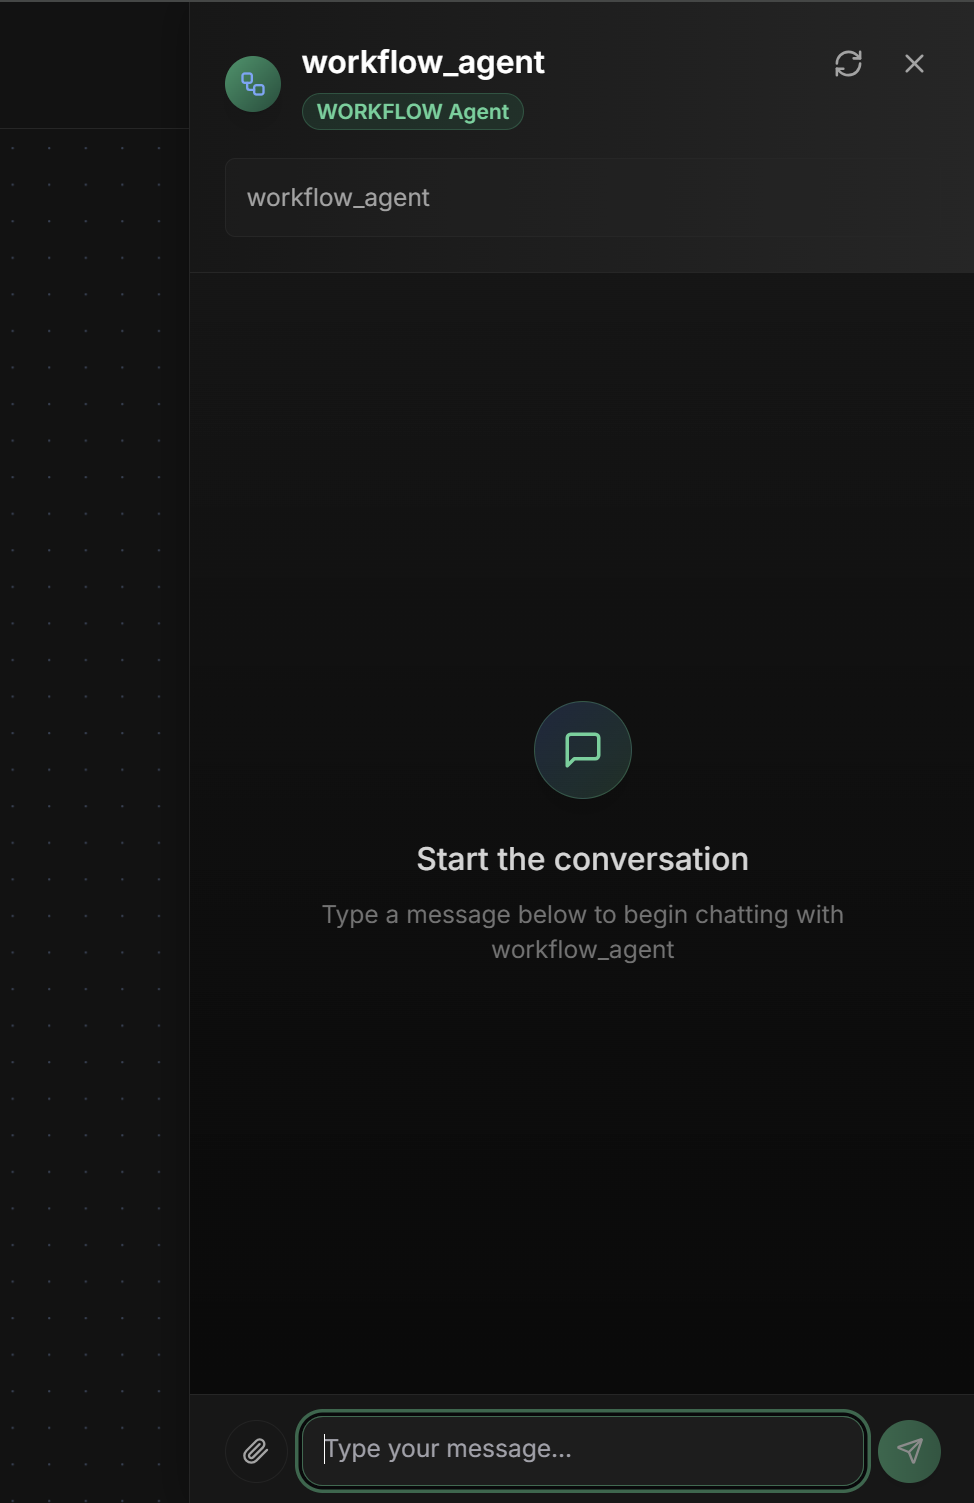
- Click “Test Workflow” in the top bar
- Configure initial workflow inputs
- Execute complete test
- Monitor real-time execution
- Analyze final results
- Step-by-step execution: See each node being executed
- Data visualization: Track data flowing between nodes
- Breakpoints: Pause execution at specific nodes
- Detailed logs: Complete execution records
- Performance metrics: Execution time per node
Monitoring and Debugging
Execution Dashboard
Real-time Monitoring
Real-time Monitoring
Visual execution tracking:React Flow Visualization:Alerts and notifications:
- Active nodes highlighted in green
- Completed nodes marked with ✓
- Error nodes marked with ✗
- Data flow visualized in connections
- Execution failures
- Node timeouts
- Infinite loops detected
- Performance degradation
Advanced Debugging
Advanced Debugging
Specific debugging tools:1. Visual Breakpoints2. Data Inspector3. Execution Replay4. Performance Profiler
Advanced Settings
Performance Optimization
Execution Optimization
Execution Optimization
Strategies for efficient workflows:Intelligent Parallelization:Result Caching:Resource Management:
Resilience and Reliability
Resilience and Reliability
Settings for robust workflows:Error Handling:State Management:Monitoring and Alerting:
Output Key - Workflow Result
Output Key - Workflow Result
Output Key field in interface:The Output Key allows the Workflow Agent to save the final result of the complex workflow in a specific variable in the shared state, making it available to other agents or processes.How it works:- Configure the
Output Keyfield with a descriptive name - The final workflow result (last executed node) will be saved automatically
- Other agents can access using placeholders
{{output_key_name}} - Works in nested workflows, loops and multi-agent systems
- Use snake_case:
workflow_result,process_complete - Be specific:
credit_approval_workflowinstead ofworkflow - Document final result structure
- Consider including execution metadata (path, timing, status)
- Use names that reflect business process
- Configure last node to produce structured result
Best Practices
Workflow Design
Workflow Design
Principles for effective workflows:
- Modularity: Divide complex workflows into sub-workflows
- Idempotence: Ensure re-executions are safe
- Observability: Add adequate logging and monitoring
- Error handling: Handle failures gracefully
- Performance: Optimize critical paths
Collaboration and Maintenance
Collaboration and Maintenance
Team practices:
- Documentation: Document purpose of each node
- Versioning: Use version control for workflows
- Testing: Implement automated tests
- Code review: Review workflows before production
- Monitoring: Monitor performance and reliability
Common Use Cases
Content Approval
Quality Workflows:
- Automatic quality analysis
- Conditional approval
- Correction loops
Lead Processing
Intelligent Qualification:
- Data enrichment
- Automatic scoring
- Intelligent routing
Process Automation
Business Process Automation:
- Approval workflows
- Document processing
- System integration
Data Analysis
Data Pipelines:
- Complex ETL
- Multi-step analysis
- Automatic reports
Next Steps
Sequential Agent
Compare with simple sequential workflows
Parallel Agent
Understand basic parallel execution
Loop Agent
Explore simple iterative loops
A2A Agent
Integrate external agents in workflows
The Workflow Agent is the most powerful tool for creating complex automations. Use it when you need granular control over each step of the process and sophisticated business logic with multiple conditions and execution paths.